Word cloud 는 중요한 단어나 키워드를 직관적으로 보여주는 시각화 도구 입니다. 이번 포스트에서는 KR-WordRank 를 이용하여 키워드를 추출한 뒤, wordcloud package 를 이용하는 과정에 대한 quick starting 을 소개합니다.
KR-WordRank
WordRank 는 띄어쓰기가 없는 중국어와 일본어에서 graph ranking 알고리즘을 이용하여 단어를 추출하기 위해 제안된 방법입니다. WordRank 는 substring graph 를 만든 뒤, graph ranking 알고리즘을 이용하여 단어스러운 substring 을 찾습니다. 그러나 한국어의 언어적 특성은 중국어와 다르기 때문에 WordRank 를 그대로 적용할 수는 없습니다.
KR-WordRank 는 한국어 어절 구조의 특징인 L + [R] 을 반영한 한국어를 위한 WordRank 입니다. KR-WordRank 는 키워드 추출의 기능도 있습니다. 더 자세한 내용은 이전의 KR-WordRank post 를 참고하세요.
영화 ‘라라랜드’의 영화평을 KR-WordRank 에 적용하면 다음의 결과를 얻을 수 있습니다.
from krwordrank.word import KRWordRank

wordrank_extractor = KRWordRank(
    min_count = 5, # 단어의 최소 출현 빈도수 (그래프 생성 시)
    max_length = 10, # 단어의 최대 길이
    verbose = True
    )

beta = 0.85    # PageRank의 decaying factor beta
max_iter = 10

keywords, rank, graph = wordrank_extractor.extract(texts, beta, max_iter)

for word, r in sorted(keywords.items(), key=lambda x:x[1], reverse=True)[:30]:
    print('%8s:\t%.4f' % (word, r))
키워드 rank
---------------
영화: 229.7889
관람객: 112.3404
너무: 78.4055
음악: 37.6247
정말: 37.2504
마지막: 34.9952
최고: 22.4425
사랑: 21.1355
뮤지컬: 20.7357
꿈을: 19.5282
여운이: 19.4032
보고: 19.4005
아름: 18.6495
진짜: 18.5599
영상: 18.1099
좋았: 17.8625
노래: 16.9019
스토리: 16.2600
좋은: 15.4661
그냥: 15.2136
현실: 15.0772
생각: 14.6264
인생: 14.2642
좋고: 13.9971
지루: 13.8732
다시: 13.7812
감동: 13.4817
느낌: 12.3127
ㅠㅠ: 12.1447
좋아: 11.9586
이 결과를 word cloud 를 이용하여 시각적으로 표현할 수 있습니다.
Word Cloud in Python (package wordcloud)
Word cloud 는 단어의 중요도에 따라 단어의 크기나 색을 변화하여 어떤 단어가 중요한지를 보여줄 수 있는 시각화 방법입니다. 이 포스트는 wordcloud 의 공식 튜토리얼의 예제가 들어있습니다.
This post includes official tutorial codes of wordcloud.
Python 에서 이용할 수 있는 word cloud packages 중에는 pytagcloud 와 wordcloud 이 있습니다.pytagcloud 는 개발이 멈춘 상태로 보이고, wordcloud 가 최근까지 업데이트가 된 것으로 보입니다. 이번 포스트에서는 wordcloud 의 quick starting 을 정리합니다.
설치는 pip install 이 가능합니다. 튜토리얼 버전은 1.4.1 입니다.
pip install wordcloud
가장 간단한 word cloud 를 그리는 코드는 아래와 같습니다. generate_from_text() 는 텍스트에서 단어의 빈도를 계산하여 이를 기반으로 클라우드를 그리며, generate_from_frequencies() 는 미리 정의된 단어의 빈도수 혹은 중요도를 이용하여 클라우드를 그립니다.
from wordcloud import WordCloud

texts = ['이것 은 예문 입니다', '여러분 의 문장을 넣 으세요']
keywords = {'이것':5, '예문':3, '단어':5, '빈도수':3}

wordcloud = WordCloud()
wordcloud = wordcloud.generate_from_text(texts)
wordcloud = wordcloud.generate_from_frequencies(keywords)
Stopwords 를 입력할 수 있습니다. Stopwords 는 빈도수를 계산할 때 제외되는 단어입니다. 영어에서 자주 이용되는 stopwords 는 wordcloud.STOPWORDS 저장되어 있습니다. type 은 Python 의 set 입니다.
from wordcloud import WordCloud
from wordcloud import STOPWORDS

stopwords = {'은', '입니다'}

wordcloud = WordCloud(stopwords=stopwords)
wordcloud = wordcloud.generate_from_text(texts)
하지만 generate_from_frequencies() 를 이용할 때에는 stopwords 가 작동하지 않습니다. 우리는 이후에 generate_from_frequencies() 를 이용하여 word cloud 를 그리기 때문에 keywords 에서 stopwords 를 미리 제거합니다.
keywords.pop('영화')
keywords.pop('관람객')
keywords.pop('너무')
keywords.pop('정말')
Word cloud image size
Word cloud 를 그리는 이미지 크기를 조절할 수 있습니다. WordCloud 의 argument 를 입력합니다.
from wordcloud import WordCloud

wordcloud = WordCloud(
    width = 800,
    height = 800
)

wordcloud = wordcloud.generate_from_frequencies(keywords)
한글 폰트 이용하기
WordCloud 의 기본 폰트는 한글을 지원하지 않습니다. Word cloud 를 그릴 때 이용할 폰트를 지정할 수 있습니다. Ubuntu 에서는 /usr/share/fonts 폴더 안에 폰트들이 들어있습니다. 저는 나눔고딕 폰트를 이용하여 이후 quick starting 을 하겠습니다.
font_path = '/usr/share/fonts/truetype/nanum/NanumBarunGothic.ttf'font_path 는 WordCloud 의 argument 로 입력합니다.
from wordcloud import WordCloud

wordcloud = WordCloud(
    font_path = font_path,
    width = 800,
    height = 800
)
wordcloud = wordcloud.generate_from_frequencies(keywords)
Show as image
위의 wordcloud 는 WordCloud 객체입니다. WordCloud 에는 __array__() 함수가 오버라이딩 되어 있습니다. 이는 객체에서 numpy.ndarray 를 return 하는 함수입니다. 만약 생성한 word cloud plot 을 RBG 형태의 ndarray 로 얻고 싶다면 to_array() 함수를 이용합니다.
def __array__(self):
    """Convert to numpy array.
    Returns
    -------
    image : nd-array size (width, height, 3)
        Word cloud image as numpy matrix.
    """
    return self.to_array()

def to_array(self):
    """Convert to numpy array.
    Returns
    -------
    image : nd-array size (width, height, 3)
        Word cloud image as numpy matrix.
    """
    return np.array(self.to_image())
array = wordcloud.to_array()
print(type(array)) # numpy.ndarray
print(array.shape) # (800, 800, 3)RBG 형태의 ndarray 는 matplotlib 을 이용하여 이미지로 만들 수 있습니다. Jupyter notebook 을 이용할 때에는 반드시 “%matplotlib inline” 을 입력해야 합니다.
만들어진 그림은 savefig 를 이용하여 저장할 수 있습니다.
%matplotlib inline
import matplotlib.pyplot as plt

fig = plt.figure(figsize=(10, 10))
plt.imshow(array, interpolation="bilinear")
plt.show()
fig.savefig('wordcloud_without_axisoff.png')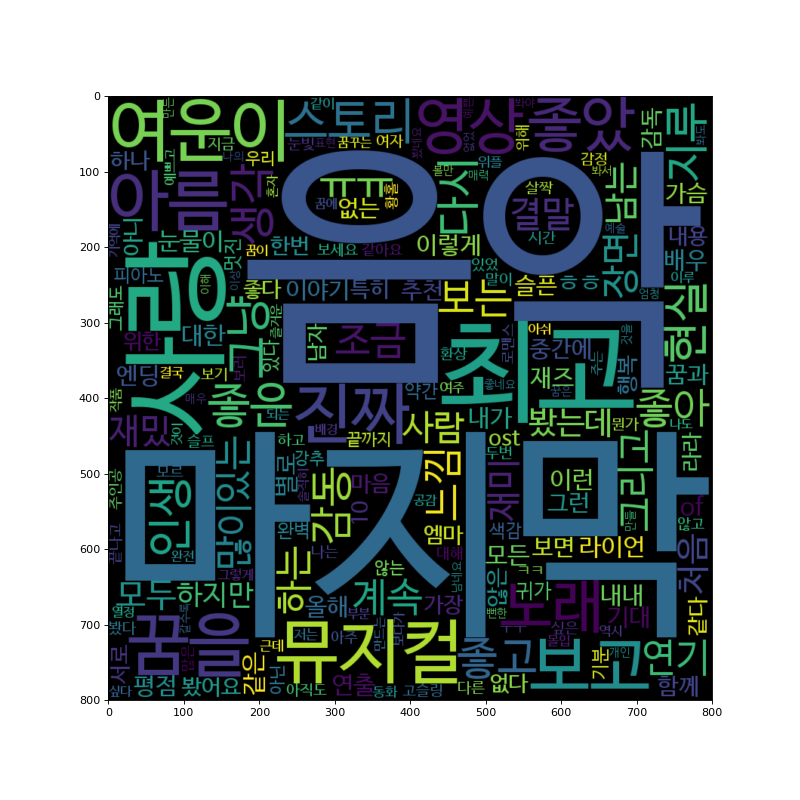
그런데 x, y 축에 (0, 800) 까지의 scale 이 보입니다. axis off 를 하면 이 숫자는 사라집니다.
plt.figure(figsize=(10, 10))
plt.imshow(wordcloud, interpolation="bilinear")
plt.axis("off")
plt.show()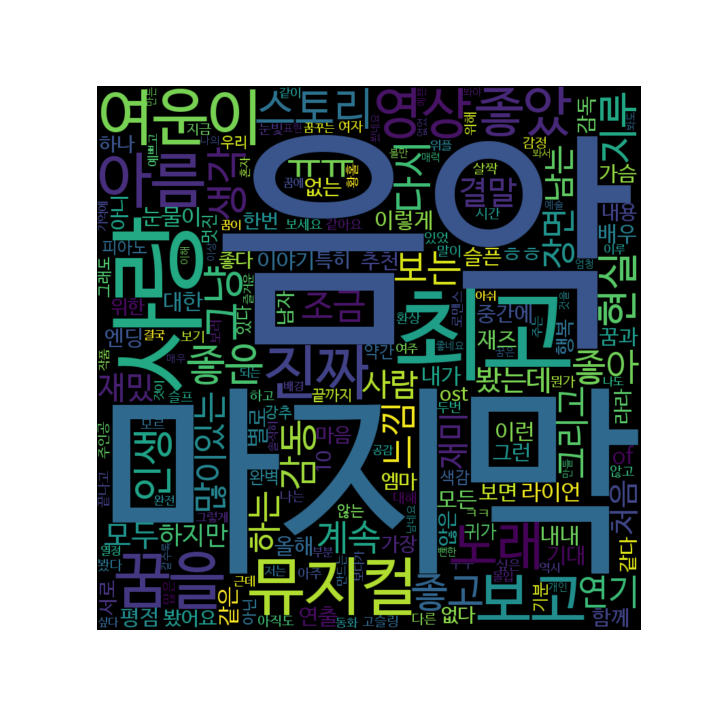
Background color
배경색을 지정하기 위해서는 WordCloud 에서 background_color 를 설정합니다.
wordcloud = WordCloud(
    font_path = font_path,
    width = 800,
    height = 800,
    background_color="white",
)

wordcloud = wordcloud.generate_from_frequencies(keywords)
plt.figure(figsize=(10, 10))
plt.imshow(wordcloud, interpolation="bilinear")
plt.axis("off")
plt.show()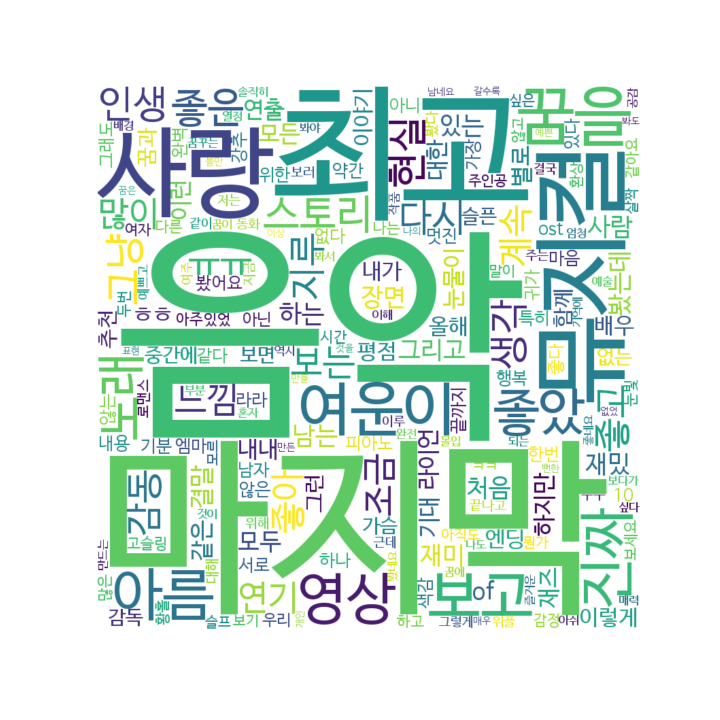
Group color
원하는 단어들에 대해서 색을 다르게 지정할 수 있습니다. 공식 튜토리얼에서는 class 를 만들어 함수로 이용하는 코드가 올려져 있습니다. 단어마다 색을 지정하는 함수는 단어와 색의 dict 가 필요하기 때문입니다.
color_to_words 는 {‘color’: [‘word’, ‘list’]} 형식입니다.
default_color 는 str 로 입력된 color code 혹은 color name 입니다.
class SimpleGroupedColorFunc(object):
    def __init__(self, color_to_words, default_color):
        self.word_to_color = {word: color
                              for (color, words) in color_to_words.items()
                              for word in words}

        self.default_color = default_color

    def __call__(self, word, **kwargs):
        return self.word_to_color.get(word, self.default_color)
SimpleGroupedColorFunc 를 이용하여 group coloring 을 하는 방법은 아래와 같습니다. SimpleGroupedColorFunc 의 call 함수가 오버라이딩 되었기 때문에 함수처럼 이용할 수 있습니다. Word cloud 를 그린 다음 recolor 를 하여 단어의 색을 바꿉니다.
simple_color_func = SimpleGroupedColorFunc(color_to_words, default_color)
wordcloud.recolor(color_func=simple_color_func)
plt.figure(figsize=(10, 10))
plt.imshow(wordcloud, interpolation="bilinear")
plt.axis("off")
plt.show()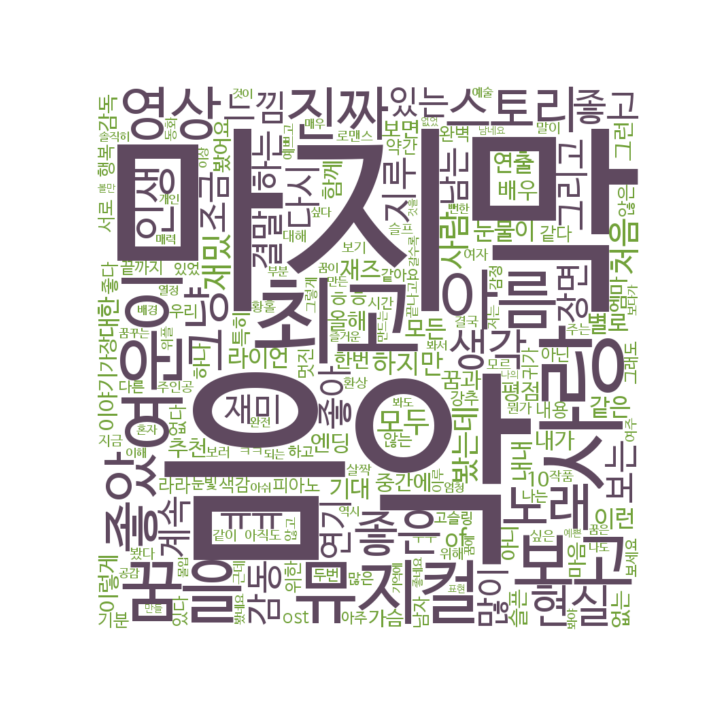
아래처럼 color_func_to_words 를 이용하면 base color 에 variation 을 줄 수 있습니다.
from wordcloud import get_single_color_func

class GroupedColorFunc(object):
    def __init__(self, color_to_words, default_color):
        self.color_func_to_words = [
            (get_single_color_func(color), set(words))
            for (color, words) in color_to_words.items()]

        self.default_color_func = get_single_color_func(default_color)

    def get_color_func(self, word):
        """Returns a single_color_func associated with the word"""
        try:
            color_func = next(
                color_func for (color_func, words) in self.color_func_to_words
                if word in words)
        except StopIteration:
            color_func = self.default_color_func

        return color_func

    def __call__(self, word, **kwargs):
        return self.get_color_func(word)(word, **kwargs)
grouped_color_func = GroupedColorFunc(color_to_words, default_color)
wordcloud.recolor(color_func=grouped_color_func)
plt.figure(figsize=(10, 10))
plt.imshow(wordcloud, interpolation="bilinear")
plt.axis("off")
plt.show()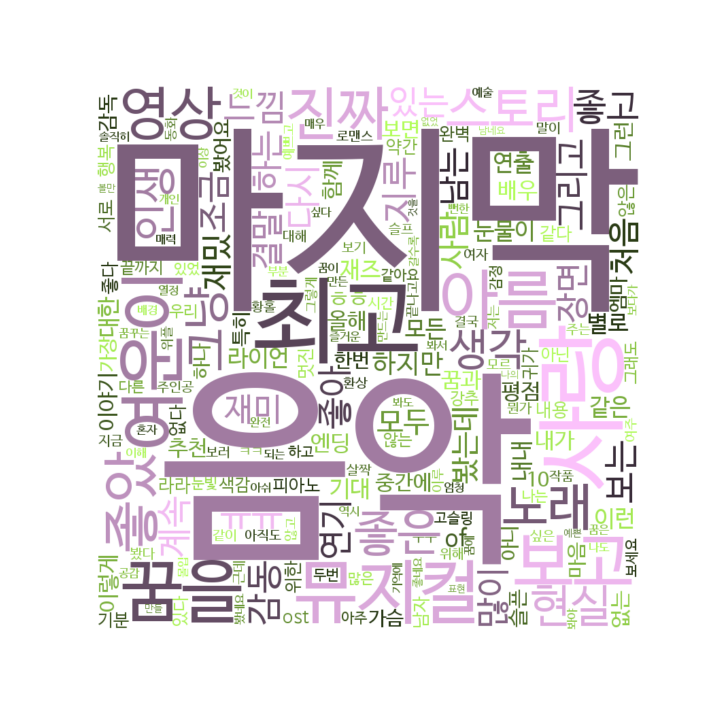
Mask with image
wordcloud package 의 가장 큰 장점은 image mask 안에 단어를 넣을 수 있는 기능이라 생각합니다. 아래 그림의 검은 부분을 단어가 들어가야 하는 부분이라 인식하고, 이 부분 안에 글자를 입력합니다.

이미지를 mask 인 numpy.ndarray 로 만들기 위해서 Image.open 과 numpy.narray 를 이용합니다.
alice_mask = np.array(Image.open("alice_mask.png"))라라랜드 영화의 적절한 마스크를 찾지 못하여 공식 튜토리얼의 alice mask 를 이용하였습니다.
from PIL import Image
import numpy as np

alice_mask = np.array(Image.open("alice_mask.png"))

wordcloud = WordCloud(
    font_path = font_path,
    width = 800,
    height = 800,
    background_color="white",
    mask = alice_mask
)

wordcloud = wordcloud.generate_from_frequencies(keywords)
plt.figure(figsize=(10, 10))
plt.imshow(wordcloud, interpolation="bilinear")
plt.axis("off")
plt.show()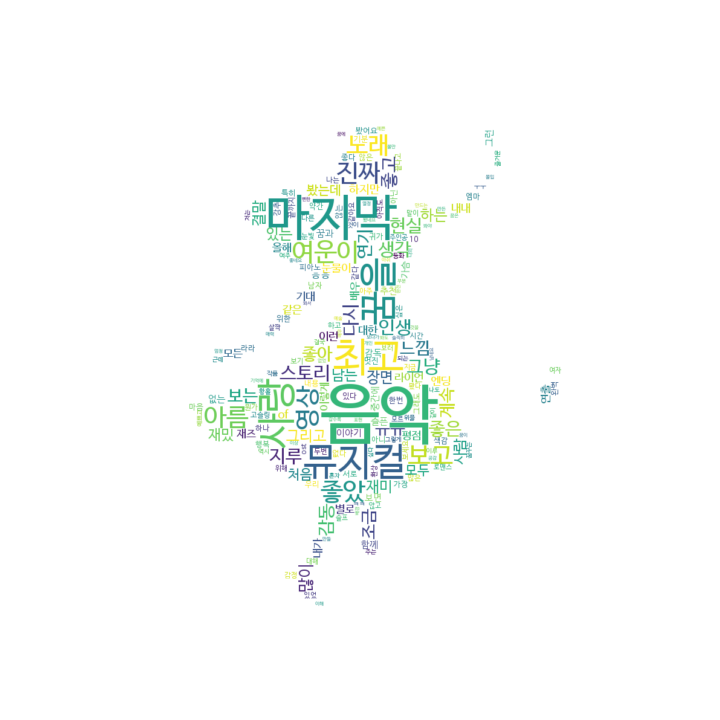
마스크가 아닌 배경은 background color 의 색으로 채워집니다. WordCloud 의 background_color argument 를 풀어버리면 다음처럼 그림이 그려집니다.
wordcloud = WordCloud(
    font_path = font_path,
    width = 800,
    height = 800,
    mask = alice_mask
)

wordcloud = wordcloud.generate_from_frequencies(keywords)
plt.figure(figsize=(10, 10))
plt.imshow(wordcloud, interpolation="bilinear")
plt.axis("off")
plt.show()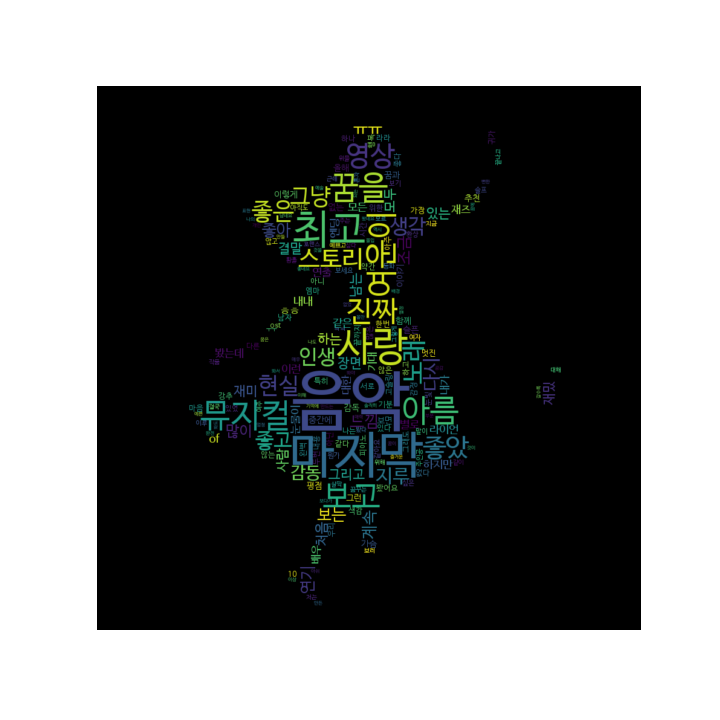
mask 형식이 아닌 그림을 입력하여도 쉬운 이미지는 mask 로 만들어줍니다.
alice_color = np.array(Image.open("alice_color.png"))

wordcloud = WordCloud(
    font_path = font_path,
    width = 800,
    height = 800,
    background_color="white",
    mask = alice_color
)

wordcloud = wordcloud.generate_from_frequencies(keywords)

plt.figure(figsize=(10, 10))
plt.imshow(wordcloud, interpolation="bilinear")
plt.axis("off")
plt.show()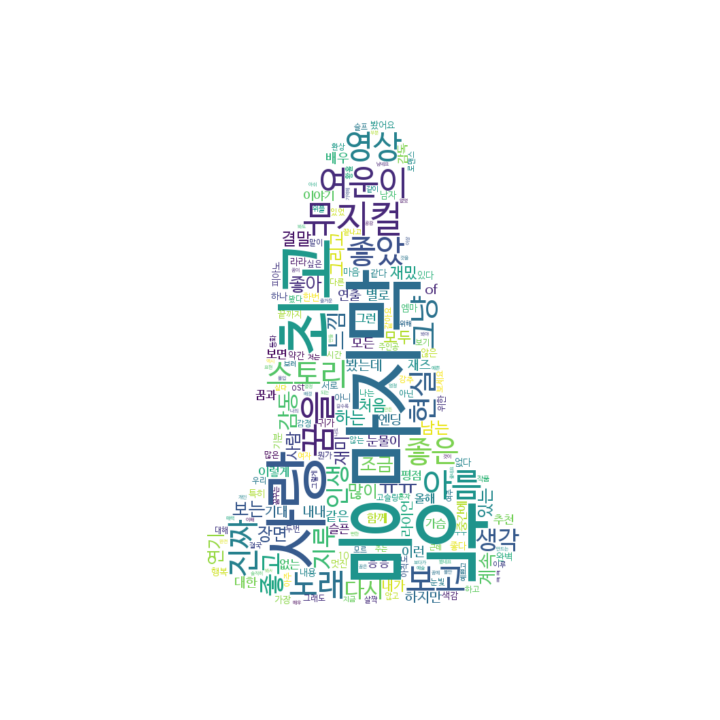
하지만 아래 그림처럼 mask 를 만들기 어려운 그림은 잘 만들어지지 않습니다. 이때에는 image segmentation 을 따로 수행하여 마스크를 만든 뒤 적용해야 합니다.

wordcloud = WordCloud(
    font_path = font_path,
    width = 800,
    height = 800,
    background_color="white",
    mask = lalaland_color
)

wordcloud = wordcloud.generate_from_frequencies(keywords)

fig = plt.figure(figsize=(10, 10))
plt.imshow(wordcloud, interpolation="bilinear")
plt.axis("off")
plt.show()
fig.savefig('wordcloud_lalaland_image.png')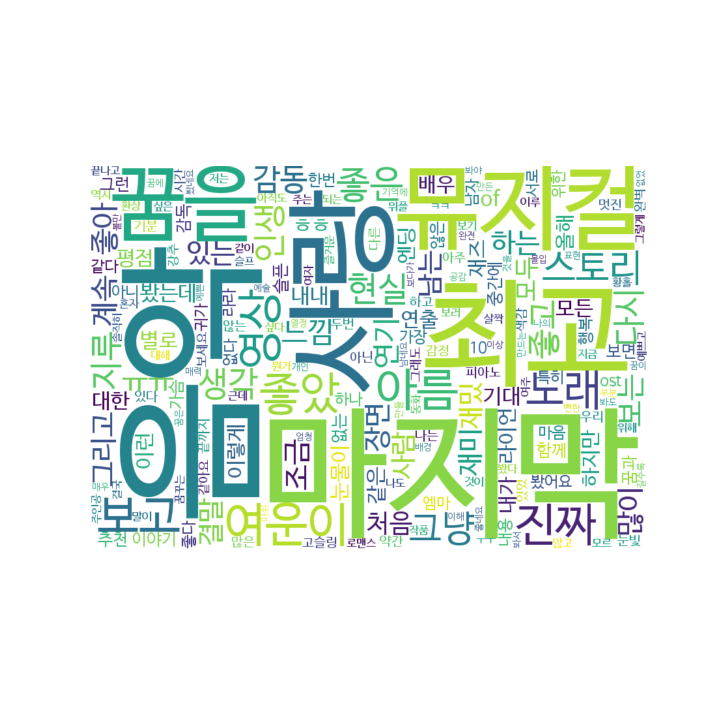
Text rotation
Word cloud 는 공간이 부족하면 텍스트의 방향을 회전합니다. WordCloud 의 argument 에 이를 조절하는 패러매터는 있습니다. 하지만 현재 버전 (1.4.1)의 공식 문서에서도 모든 단어를 회전하지 않는 기능은 아직 제공하지 않는다고 적혀있습니다.
The ratio of times to try horizontal fitting as opposed to vertical. If prefer_horizontal < 1, the algorithm will try rotating the word if it doesn’t fit. (There is currently no built-in way to get only vertical words.)
wordcloud = WordCloud(
    font_path = font_path,
    width = 800,
    height = 800,
    background_color="white",
    prefer_horizontal = 0.9999, # horizontal preference
    min_font_size = 10 # min font size
)